Now that we’re able to leverage Akka.Cluster.Sharding, DistributedPubSub, and ClusterClient it’s time for us to move past docker-compose and use a tool that’s better-suited for running Akka.NET and Docker in production: Kubernetes or K8s for short-hand.
Most of the hard work in this lesson was already accomplished during lesson 2, when we first Dockerized our Akka.Cluster application. Now we’re going to take that hard work and use it to help us run Akka.CQRS in an environment that can be continuously deployed to without any data loss or downtime.
Getting Started
To start this lesson, we need to checkout to the lesson5 branch in our git repository:
PS> git checkout lesson5
Once there, take a look at the ./k8s folder - you should need a number of YAML files:
lighthouse-deploy.yaml- used to deploy the Lighthouse service inside K8s.mongodb-deploy.yaml- deploys a stand-alone MongoDb instance that will be used as an Akka.Persistence target by the Akka.CQRS.TradeProcessor and the Akka.CQRS.Pricing services.pricing-deploy.yaml- deploys the Akka.CQRS.Pricing service.pricing-web-deploy.yaml- deploys the Akka.CQRS.Pricing.Web service.tradeprocessor-deploy.yaml- deploys the Akka.CQRS.TradeProcessor service.traders-deploy.yaml- deploys the Akka.CQRS.Traders service.
In order for any of these services to be deployed, we’re going to need to build the Docker container image versions that each of these images expects by default:
- akka.cqrs.pricing:0.1.0
- akka.cqrs.traders:0.1.0
- akka.cqrs.tradeprocessor:0.1.0
- akka.cqrs.pricing.web:0.1.0
You should have already built these Docker images at the end of lesson 4, but if you haven’t, go ahead and build them now using our Docker build process.
Why do we use a specific version tag on our Docker images in our Kubernetes service definitions? Why not just use
akka.cqrs.pricing:latestand so forth? The reason why is because when you set thelatesttag on a Docker image in K8s service then K8s will always try to pull that image from DockerHub by default - and if your image isn’t available in a public DockerHub repository then K8s will fail to start that service. Specifying a versioned image tag causes K8s to look in the locally available packages first rather than attempting to pull from DockerHub.
Now that we have our Docker images ready to go for Akka.CQRS, let’s do a quick breakdown on what these Kubernetes YAML files do exactly.
Configuring Deployments and Services in Kubernetes
Let’s start by taking a look at the YAML file used for deploying our Akka.CQRS.TradeProcessor service:
apiVersion: v1
kind: Service
metadata:
  namespace: akka-cqrs
  name: trade-processor
  labels:
    app: trade-processor
spec:
  clusterIP: None
  ports:
  - port: 5110
  selector:
    app: trade-processor
---
apiVersion: apps/v1
kind: StatefulSet
metadata:
  namespace: akka-cqrs
  name: trade-processor
  labels:
    app: trade-processor
spec:
  serviceName: trade-processor
  replicas: 2
  selector:
    matchLabels:
      app: trade-processor
  template:
    metadata:
      labels:
        app: trade-processor
    spec:
      terminationGracePeriodSeconds: 35
      containers:
      - name: trade-processor
        image: akka.cqrs.tradeprocessor:0.1.0
        lifecycle:
          preStop:
            exec:
              command: ["/bin/sh", "-c", "pbm 127.0.0.1:9110 cluster leave"]
        env:
        - name: ACTORSYSTEM
          value: AkkaTrader
        - name: ENABLE_PHOBOS
          value: "true"
        - name: MONGO_CONNECTION_STR
          value: "mongodb://mongodb:27017/akkaTrader"
        - name: STATSD_PORT
          value: "8125"
        - name: STATSD_URL
          value: "statsd-agent"
        - name: JAEGER_AGENT_HOST
          value: "jaeger-agent"
        - name: POD_NAME
          valueFrom:
            fieldRef:
              fieldPath: metadata.name
        - name: CLUSTER_IP
          value: "$(POD_NAME).trade-processor"
        - name: CLUSTER_PORT
          value: "5110"
        - name: CLUSTER_SEEDS
          value: akka.tcp://$(ACTORSYSTEM)@lighthouse-0.lighthouse:4053,akka.tcp://$(ACTORSYSTEM)@lighthouse-1.lighthouse:4053,akka.tcp://$(ACTORSYSTEM)@lighthouse-2.lighthouse:4053
        livenessProbe:
          tcpSocket:
            port: 5110
        ports:
        - containerPort: 5110
          protocol: TCP
This file fundamentally defines three things:
- A Kubernetes “Service” named
trade-processor- services are the means by which we expose Kubernetes Pods to each other inside the K8s network. The service gives us an internal domain name (trade-processor) other K8s resources can use to access the pods created by thetrade-processorstateful set. - A StatefulSet is a type of deployment in Kubernetes, intended for applications that house in-memory state that needs to be carefully managed across deployments. The statefulset describes a set of Kubernetes Pods, the ports that they’ll expose to other resources inside K8s, the Docker images that will run as containers inside the Pods, and the environment variables these containers will be started with.
- A Kubernetes namespace that all of these resources will run inside of; in this case, it will be the
akka-cqrsnamespace.
Let’s breakdown each one of these resources before we move onto executing our Kubernetes deployment of Akka.CQRS.
Namespaces
Namespaces are a way of defining a virtual cluster inside the physical Kubernetes cluster - effectively they’re a type of scope that isolates all other resources under the same namespace from any other Kubernetes services running in different namespaces.
Namespaces can be really useful for scenarios such as providing different staging, testing, and production environments. Namespaces are also popular with large teams of developers all accessing the same underlying Kubernetes hardware, but with a desire for logical boundaries that can keep developers from different product groups from tripping over each other’s resources.
In our scenario, we’re going to stick all of our resources under the akka-cqrs namespace in order to make it easier for us to delete and cleanup our Kubernetes cluster once we’re done with this workshop, and you can tell which namespace we’re deploying our resources to via the following properties in our YAML files:
metadata:
  namespace: akka-cqrs
Technically speaking, we could also accomplish this through the use of the Kubernetes labels and selectors - but namespaces seemed appropriate for our use case.
Pods, Controllers, and Deployments
The fundamental unit of computation in Kubernetes is a pod - a pod encapsulates one or more Docker containers, storage resources, a unique network address, and other configuration options that dictate how the pod should operate - such as liveness probes that can dictate when a pod needs to be restarted.
You can think of a pod as a single running process instance of your application.
In Akka.CQRS all of our application services consist of pods deployed with single Docker containers - there are some scenarios where running multiple containers inside a single pod makes sense. For instance, if you might want to deploy a Jaeger tracing agent as a sidecar container alongside your application container in order to pre-aggregate tracing data before uploading it to a Jaeger tracing collector. However, use cases like these are relatively uncommon - most pods run as a single container instance.
A pod by itself isn’t all that useful - in order to ensure a high degree of availability for our applications we should run multiple pods together. That’s what Deployments are for in Kubernetes. Deployments are used to tell Kubernetes how to give us parallelism and scalability through maintaining multiple replicas of each pod, distributed across multiple Docker host machines.
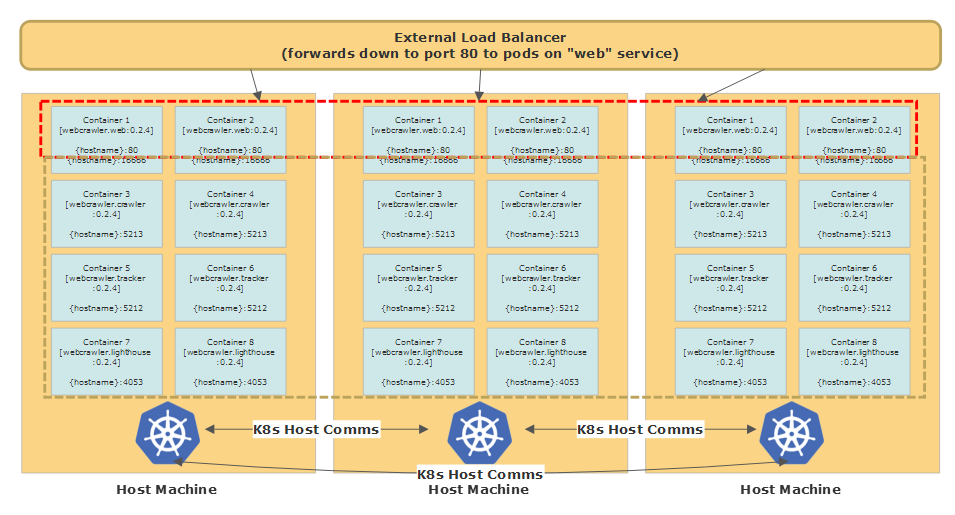
This image is taken from Petabridge’s “Continuous Deployment with Akka.Cluster and Kubernetes (Akka.NET)” Webinar, which you can watch on YouTube here.
One thing you’ll notice is that with the notable exception of our Akka.CQRS.Pricing.Web service, all of our applications are deployed as StatefulSets. This is a best practice for Akka.NET applications because typically Akka.NET applications are responsible for housing business-critical state in-memory.
apiVersion: apps/v1
kind: StatefulSet
metadata:
  namespace: akka-cqrs
  name: trade-processor
  labels:
    app: trade-processor
spec:
  serviceName: trade-processor
  replicas: 2
  selector:
    matchLabels:
      app: trade-processor
template:
    metadata:
      labels:
        app: trade-processor
    spec:
      terminationGracePeriodSeconds: 35
      containers:
      - name: trade-processor
        image: akka.cqrs.tradeprocessor:0.1.0
You’ll notice that we specify a Docker image and version inside the containers.image property inside this YAML file - that tells Kubernetes what containers we need to run inside this pod. Fundamentally, deployments in Kubernetes are done by changing the version of the Docker image used inside a pod’s container. More on that in a moment.
Stateful applications have to be deployed differently than traditional stateless applications, such as most web applications, because if state isn’t properly persisted and handed off to another available node we can potentially lose data or corrupt it. StatefulSets in Kubernetes are one of the few deployment tools in the marketplace that actually handle these scenarios quite well.
When updating a StatefulSet, Kubernetes will use a Rolling Update strategy by default - one-by-one all of the existing replicas in the StatefulSet (there are 2 by default in all of the Akka.CQRS YAML files, but this number can be dynamically scaled up and down) are will be gracefully stopped, deleted, and then re-created using the updated version of the Docker image.
This process takes a bit longer since each node needs an opportunity to terminate gracefully first, but that’s what affords our stateful Akka.NET applications the opportunity to persist their state and begin handing over their workloads to other available nodes still running inside the Akka.NET cluster. This works especially well in combination with the Akka.Cluster.Sharding setup we used in lesson 4.
Bonus Exercise: The Akka.CQRS.Pricing.Web application is currently deployed as a plain old Deployment in Kubernetes. What will happen when we roll out an update to it? Is it possible that we might have some downtime? Why or why not? If so, how could we avoid it?
Graceful Termination of Pods
One of the reasons why we included an installation of the Petabridge.Cmd pbm client into our Dockerfile definitions in lesson 2 is because we can use this to send specific passivation / graceful termination instructions to each of our pods when it’s time to shutdown:
template:
    metadata:
      labels:
        app: trade-processor
    spec:
      terminationGracePeriodSeconds: 35
      containers:
      - name: trade-processor
        image: akka.cqrs.tradeprocessor:0.1.0
        lifecycle:
          preStop:
            exec:
              command: ["/bin/sh", "-c", "pbm 127.0.0.1:9110 cluster leave"]
The cluster leave Petabridge.Cmd instruction will cause the current node running inside this Kubernetes pod to exit the cluster and hand over all of its shards to other members of the same ShardRegion prior to exiting. This is the type of graceful handoff we need to ensure that our state is both persisted and recovered gracefully without any issues during an upgrade - and Kubernetes makes it really easy for us to ensure this via the Kubernetes pod lifecycle events.
Services and Pod Networking
The last critical piece of our Kubernetes YAML file is the service definition, which defines how other Kubernetes resources can contact us.
apiVersion: v1
kind: Service
metadata:
  namespace: akka-cqrs
  name: trade-processor
  labels:
    app: trade-processor
spec:
  clusterIP: None
  ports:
  - port: 5110
  selector:
    app: trade-processor
What this service definition declares is that all pods that have the app: trade-processor label can be accessed via the internal domain name trade-processor (the metadata.name for this service) on port 5110. The underlying Kubernetes network, which spans across multiple physical host machines, is able to make this service reachable to all pods in the same namespace transparently.
Once we’re aware of our service’s name, we can expose that data to Akka.Cluster through the use of Kubernetes functions and environment variables in order to ensure that all of our different Akka.NET pods are able to reach each other over the network:
        env:
        - name: ACTORSYSTEM
          value: AkkaTrader
        - name: ENABLE_PHOBOS
          value: "true"
        - name: MONGO_CONNECTION_STR
          value: "mongodb://mongodb:27017/akkaTrader"
        - name: STATSD_PORT
          value: "8125"
        - name: STATSD_URL
          value: "statsd-agent"
        - name: JAEGER_AGENT_HOST
          value: "jaeger-agent"
        - name: POD_NAME
          valueFrom:
            fieldRef:
              fieldPath: metadata.name
        - name: CLUSTER_IP
          value: "$(POD_NAME).trade-processor"
        - name: CLUSTER_PORT
          value: "5110"
        - name: CLUSTER_SEEDS
          value: akka.tcp://$(ACTORSYSTEM)@lighthouse-0.lighthouse:4053,akka.tcp://$(ACTORSYSTEM)@lighthouse-1.lighthouse:4053,akka.tcp://$(ACTORSYSTEM)@lighthouse-2.lighthouse:4053
        livenessProbe:
          tcpSocket:
            port: 5110
        ports:
        - containerPort: 5110
          protocol: TCP
You’ll notice that the POD_NAME environment variable appears to be dynamically computed, using the metadata.name of each pod being deployed. This is no accident - to address pods individually over a service in Kubernetes, this can be accomplished using the following syntax: {pod name}.{service name}.
So in this case, we use the Akka.Bootstrap.Docker environment variables that we set up in lesson 2 to tell our Akka.CQRS.Pricing services the hostname they need to use when they identify themselves to the rest of the cluster:
- name: CLUSTER_IP
  value: "$(POD_NAME).trade-processor"
In addition to that, we need to populate the CLUSTER_SEEDS environment variable to contain the hostnames of our Lighthouse nodes - so we can form a cluster automatically when each pod starts up:
- name: CLUSTER_SEEDS
  value: akka.tcp://$(ACTORSYSTEM)@lighthouse-0.lighthouse:4053,akka.tcp://$(ACTORSYSTEM)@lighthouse-1.lighthouse:4053,akka.tcp://$(ACTORSYSTEM)@lighthouse-2.lighthouse:4053
Each one of these Akka.NET addresses will match the Service DNS name as well as the pod-specific hostname for up to three Lighthouse pods. Additionally, we also pass in our MONGO_CONNECTION_STR environment variable which uses the service name of our MongoDb pod.
LoadBalancer Services
So far all of the services we’ve used have been deployed as Headless ClusterIP Services in Kubernetes, which are only accessible from inside the Kubernetes cluster and don’t offer any kind of load-balancing or static addressing.
For our Akka.CQRS.Pricing.Web nodes, we want to expose those services to external traffic and load-balance the requests among all of the pods that are part of the pricing-web application - and that’s exactly what LoadBalancer services are for in Kubernetes.
apiVersion: v1
kind: Service
metadata:
  namespace: akka-cqrs
  name: pricing-ui
  labels:
    app: pricing-web
spec:
  ports:
    - name: query-http
      port: 80
      protocol: TCP
      targetPort: 80
  selector:
    app: pricing-web
  type: LoadBalancer
What this service definition specifies, is that we’re going to open up a TCP port to external traffic on port 80 and route that traffic to pods running under the app: pricing-web label, which are also listening for incoming traffic on port 80.
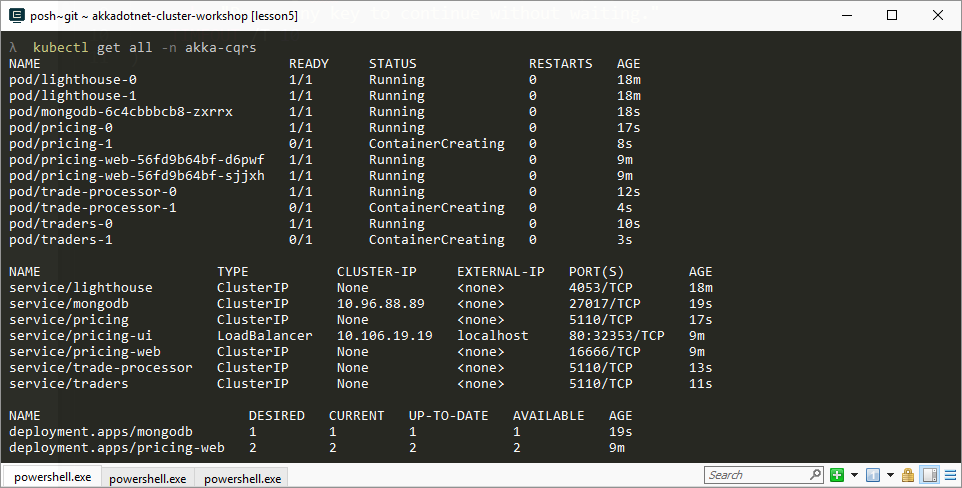
When we create this service type in Kubernetes, following deployment you’ll see the following information if you invoke kubectl get all -n akka-cqrs:
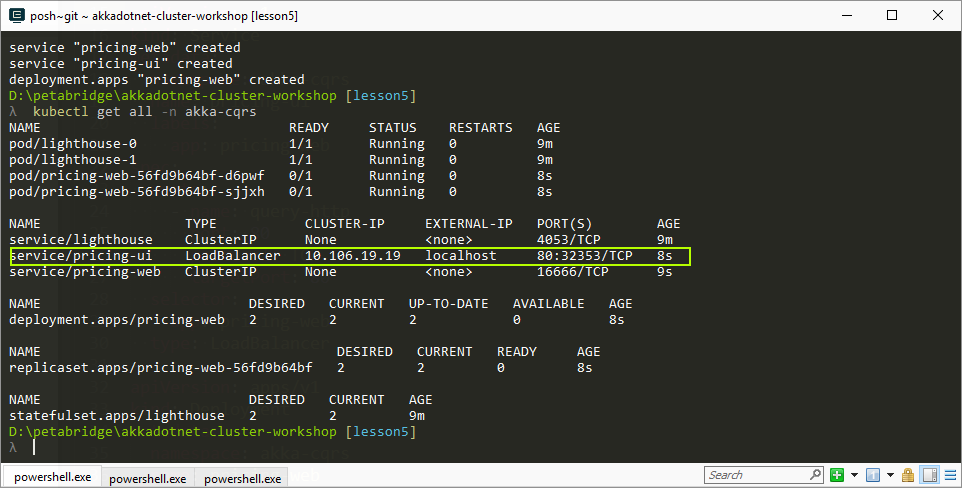
Notice the EXTERNAL-IP property - this is the external hostname you can use to reach the pods running under this service, and after our cluster is fully deployed in the next step you’ll be able to see some live pricing output streamed to the Akka.CQRS.Pricing.Web UI at http://localhost.
NOTE: In a cloud-hosted Kubernetes environment such as Azure Kubernetes Service, Azure will automatically create a public Azure Load Balancer and an Azure DNS name that you can use to access your publicly accessible LoadBalancer Kubernetes services.
Running Our Deployment
Now that we’ve built our Akka.CQRS Docker images and have our Kubernetes YAML files ready to go, it’s time to deploy our services and see them happen.
Scaling Up Docker for Windows’ Resources
One note of caution: Kubernetes can be used to run a massive number of pods in parallel, but since we’re working with Docker for Windows - all of our containers are going to be deployed onto the tiny Hyper-V virtual machine created by the Docker for Windows runtime.
In order to ensure that Kubernetes AND our Akka.NET applications remain responsive, especially when we start using Phobos actor tracing and monitoring in lesson 6, it might be a good idea to scale up the resources our Hyper-V VM is using to run these Linux containers in the background.
Warning: This steps will prompt Docker to be re-installed and may cause issues with the Windows firewall. If you cannot edit or change the firewall settings please skip these steps.
Open Docker for Windows and click Settings and then go to Advanced.
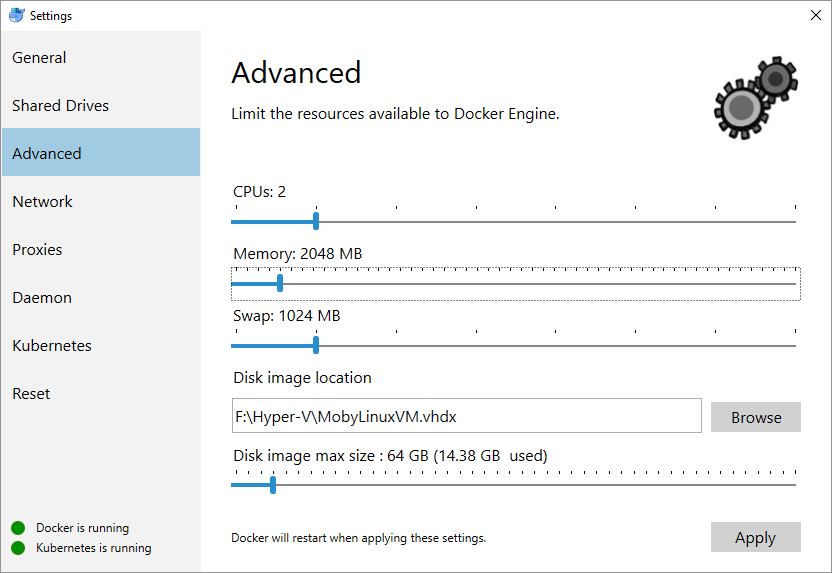
By default, your Hyper-V VM will usually be using two logical CPUs and up to 2GB of RAM. We recommend adjusting your Docker engine to use the following values instead:
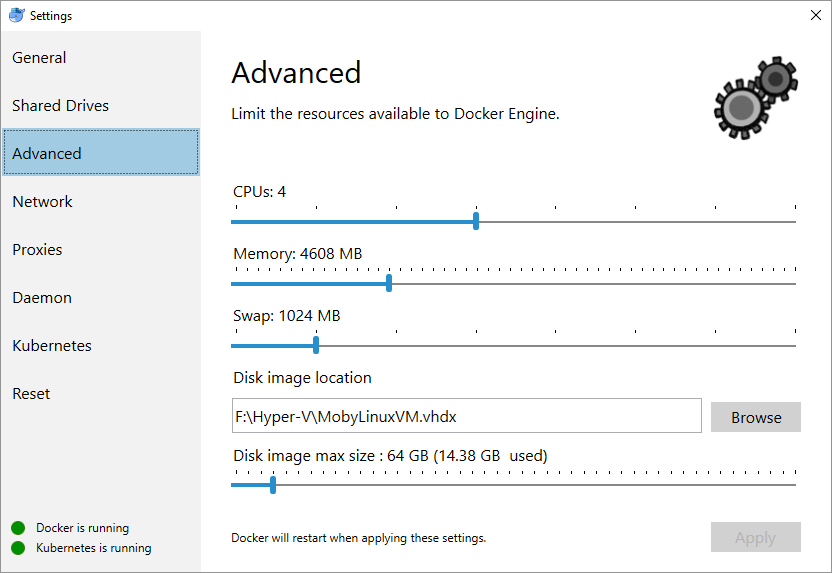
4-4.5GB of RAM and 4 logical CPUs. This will help ensure that both Kubernetes and Docker are responsive even when containers such as Jaeger and MongoDb are hitting disk and the network heavily inside the host VM.
Using kubectl to Deploy Kubernetes Resources
To execute our deployment, we’re going to use the kubectl command-line interface for Kubernetes.
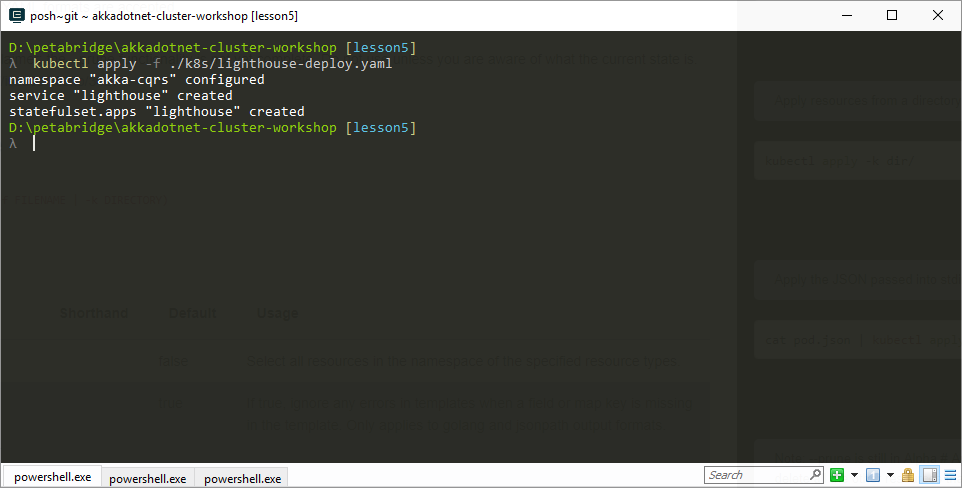
To deploy a service for the first time using a YAML file like the ones we’ve defined in the ./k8s folder, we’re going to use the kubectl apply command:
PS> kubectl apply -f ./k8s/lighthouse-deploy.yaml
The output from this call will look like this:
Now, if we want to deploy all of our Kubernetes services for the Akka.CQRS solution, there’s a script in the root directory of the solution we can execute:
PS> ./deployK8sServices.cmd
This will call kubectl apply -f ./k8s/{filename}.yaml on every single .yaml file in the ./k8s directory, so you don’t need to manually type out the command for every single service.
Once this deployment has started, we can check on the status of our services using kubectl get command:
PS> kubectl get all -n akka-cqrs
We need to use the -n akka-cqrs command in order to tell Kubernetes that we want to query only the resources inside the akka-cqrs namespace we created earlier.
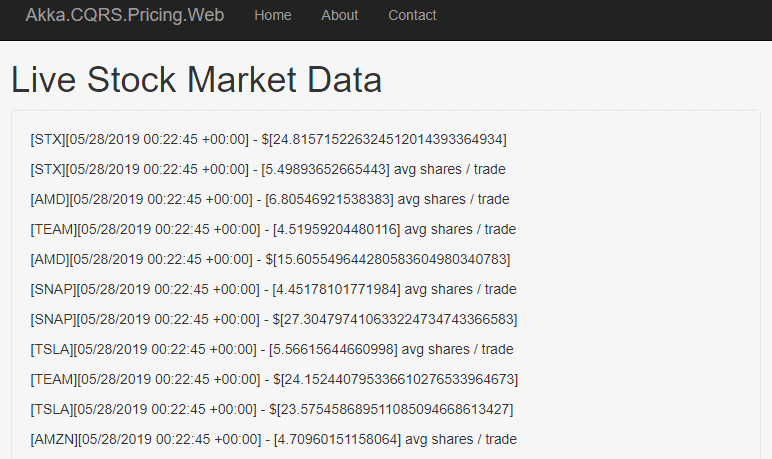
Once our cluster has had a few minutes to create all of its pods and let our Akka.NET cluster fully form together, we should be able to travel to http://localhost and see live stock price and volume data appear in 10 second intervals on-screen:
Executing Commands inside Pods
If you want to follow along and watch these deployments get rolled out to your Akka.NET cluster in real-time, we recommend that you execute the following Petabridge.Cmd command:
PS> kubectl -n akka-cqrs exec lighthouse-0 pbm 127.0.0.1:9110 cluster tail
The kubectl exec command allows us to execute commands directly inside our pods, which can be really useful for troubleshooting, monitoring, and management of our application. Since we have Petabridge.Cmd installed on each one of our pods, we can use it to monitor the behavior of Akka.Cluster from inside our Kubernetes cluster.
The cluster tail command will allow you to track real-time changes to your cluster’s membership and since the Lighthouse nodes aren’t affected by any of these deployments, you’ll receive an unbroken stream of data from these nodes as the deployment occurs.
Bonus Exercise: what other commands should we run inside our Akka.NET cluster? Could we get some information about the state of Akka.Cluster.Sharding perhaps? Or what about the state of our Akka.Remote connection history? Do we have any Petabridge.Cmd palettes installed that will allow us to do that?
Scaling Your Kubernetes Cluster with kubectl
Now that we’ve deployed our cluster successfully, let’s try scaling up the Akka.CQRS.Traders service -the service responsible for making bids and asks on stocks.
We can do this via the kubectl scale command:
PS> kubectl -n akka-cqrs scale statefulsets traders --replicas=4
This will scale the number of replicas in our traders StatefulSet from 2 to 4 and we can verify this with another kubectl -n akka-cqrs get all command.
You can also verify this by using a Petabridge.Cmd cluster show command:
PS> kubectl -n akka-cqrs exec lighthouse-0 pbm 127.0.0.1:9110 cluster show
akka.tcp://[email protected]:4053 | [lighthouse] | up |
akka.tcp://[email protected]:4053 | [lighthouse] | up |
akka.tcp://[email protected]:5110 | [trade-events,pricing-engine] | up |
akka.tcp://[email protected]:5110 | [trade-events,pricing-engine] | up |
akka.tcp://[email protected]:5110 | [trade-events,trade-processor] | up |
akka.tcp://[email protected]:5110 | [trade-events,trade-processor] | up |
akka.tcp://[email protected]:5110 | [trader,trade-events] | up |
akka.tcp://[email protected]:5110 | [trader,trade-events] | up |
akka.tcp://[email protected]:5110 | [trader,trade-events] | joining |
Count: 9 nodes
Looks like everything is still going smoothly if we take a look at the logs and output of our application, so maybe we should try scaling the traders stateful set back down to 2 pods again. We can do this using the exact same command.
PS> kubectl -n akka-cqrs scale statefulsets traders --replicas=2
If you follow along with the Petabridge.Cmd cluster tail command inside one of the Lighthouse nodes, you’ll watch the trader nodes gracefully exit the cluster one at a time - exactly how a stateful set is supposed to work.
Cleaning Up
To destroy your Kubernetes cluster, invoke the following command:
PS> ./stopK8sServices.cmd
This will completely delete all of the Kubernetes resources in the akka-cqrs namespace.
Next
Now we’re onto the final lesson: Lesson 6 - Monitoring Akka.NET with Phobos