Now that we have our Akka.Cluster up and running, we want to be able to easily deploy and manage it. The first step will be to containerize our application using Docker.
Getting Started
To start this lesson, we need to checkout to the lesson2 branch in our git repository:
PS> git checkout lesson2
Containerizing our application will provide us with the following benefits:
- Allow us to separate services to easily manage and scale each one individually.
- Allow us to easily share our application as compiled Docker images across different environments, host machines, and work stations.
- Allow us to incrementally version each iteration of our application via Docker image tags.
- Keep a low footprint for our application.
- Allow us to work with other deployment and orchestration tools like Kubernetes to manage our cluster.
Introducing Docker to Akka.CQRS
To begin working with Docker, we will make use of a Dockerfile to compose an image for each of the services in our application. You can think of an image as an instruction set for a container, which will specify how that container is going to behave and what inputs it requires. This will be our starting point to deploying our application using Docker.
Let’s take a look at one of the Dockerfiles that we will use in our project and learn what each part does. Below you can see the Dockerfile used to build our Akka.CQRS.TradePlacers.Service image:
FROM microsoft/dotnet:2.1-sdk AS base
WORKDIR /app

# should be a comma-delimited list
ENV CLUSTER_SEEDS "[]"
ENV CLUSTER_IP ""
ENV CLUSTER_PORT "5054"

COPY ./bin/Release/netcoreapp2.1/publish/ /app

# 9110 - Petabridge.Cmd
# 5055 - Akka.Cluster
EXPOSE 9110 5054

# Install Petabridge.Cmd client
RUN dotnet tool install --global pbm

# Needed because https://stackoverflow.com/questions/51977474/install-dotnet-core-tool-dockerfile
ENV PATH="${PATH}:/root/.dotnet/tools"

# RUN pbm help

CMD ["dotnet", "Akka.CQRS.TradePlacers.Service.dll"]
In the first line of our Dockerfile, we are letting Docker know the base image that we will be working on top of will be Microsoft’s dotnet 2.1 sdk image. We need the .NET SDK image to run the .NET Core Global Tool infrastructure in our container so we can install and invoke the Petabridge.Cmd tool for cluster management and monitoring operations in the future.
Next, you will notice that we introduce three environment variables; CLUSTER_SEEDS, CLUSTER_IP, AND CLUSTER_PORT- each with their default values. We need to assign values to these variables meaningful values whenever we start a container using this image, as we will need them in order to configure Akka.Bootstrap.Docker in the next section.
After we have compiled our application and have our working files ready, we will need to copy these from the host machine to the containers working directory. This is an important step and it is what will allow our container to run the service we need for our application. This is what the COPY operation does: it copies the binary output from the ./bin/Release/netcoreapp2.1/publish/ folder on the host machine that is building the Docker image into the /app folder inside the Docker image itself. The ./app directory is the working directory inside this container.
By default, when a container is created it will not be able to talk to any service outside of the Docker network. If we need to have the ability to communicate with someone or something outside of the Docker network, we will need to specify that we would like to expose a port out to the host machine. As mentioned earlier we will be running our pbm tool inside of our container which requires us to expose the specific TCP port out to the host machine. The EXPOSE command helps us specify which ports can be exposed to the host, although we’ll still need to use port-mapping when starting the Docker container in order for the host network to reach the container. In this case we are exposing the default 9110 port used by pbm as well as TCP port 5054 used by our Akka.Cluster.
With the ports exposed for our pbm tool, we can then run the command for our dotnet global tool to install Petabridge.Cmd inside our container. Installing the Petabridge.Cmd tool will allow us to monitor and manage the cluster running inside of our container. To be able to run a dotnet global tool command inside of our container we will need to pass an environment variable to specify the path to the global tool. If you would like to find out more information about why this variable is needed you may find this StackOverflow thread useful.
Finally we have reached the end of the Dockerfile where we specify the command that will serve as the entry point for Docker and specify the process that is needed to start and run the container: CMD ["dotnet", "Akka.CQRS.TradePlacers.Service.dll"]. In short, we’re telling the dotnet runtime to run the Akka.CQRS.TradePlacers.Service.dll. If this process dies, the Docker container will terminate along with it.
We need to have a Dockerfile inside each project folder that we plan to containerize. A good practice will be to create a template of the Dockerfile you plan to use where you can update and modify the values without having to re-write the entire file from scratch.
Once you have your Dockerfile ready to build an image, you can begin creating your images using build.cmd in the steps outlined in this article.
Using Akka.Bootstrap.Docker
With our Dockerfiles ready to go, we can start working with Akka.Bootstrap.Docker. Akka.Bootsrap.Docker is a NuGet package that allows us to pass the environment variables defined in our Dockerfile to Akka.Remote and Akka.Cluster in order to configure them dynamically. We need those variables in our configuration for the following reasons:
- We will need
CLUSTER_SEEDSto pass in the list of seed nodes our cluster will join at startup. Without these seed nodes our container will not be able to join the cluster. - If we have a hostname for our cluster we can define this value using the
CLUSTER_IPvariable to replace theakka.remote.dot-netty.tcp.public-hostnameat runtime. If we leave this value blank, we will useDns.GetHostname()instead. - Lastly we have
CLUSTER_PORT, this value will be the port number used by Akka.Remote for inbound connections.
With the variables defined in our Dockerfile and our Akka.Bootstrap.Docker NuGet package installed we can begin to implement the necessary code inside our project. The good news is that it is simple to implement. We will only need to modify our configuration string to let it know that we are going to use Akka.Bootstrap.Docker by adding .BootstrapFromDocker().
To do this, you can go to the AppBootstrap.cs file located inside your infrastructure folder akkadotnet-cluster-workshop/src/Akka.CQRS.Infrastructure. We have already included the necessary line of code and you will only need to uncomment line 35 and remove the semicolon from line 29. This will tell our configuration that we will be using Akka.Bootstrap.Docker to inject our Akka.Remote and Akka.Cluster binding values at runtime. In the end, your config variable should have the following value:
            config = config
                .WithFallback(GetOpsConfig())
                //.WithFallback(TradeEventSerializer.Config)
                //.WithFallback(ClusterSharding.DefaultConfig())
                //.WithFallback(DistributedData.DistributedData.DefaultConfig()) // needed for DData sharding
                //.WithFallback(ClusterClientReceptionist.DefaultConfig())
                //.WithFallback(DistributedPubSub.DefaultConfig())
                .BootstrapFromDocker()
Using MongoDb for Akka.Persistence
Now that we know how to create Docker images and use Akka.Bootstrap.Docker we are one step closer to deploying our application using production-grade containers. One of the things we want to manage with our application containers is what happens when they die or restart. When a container dies all of the runtime data for that container dies along with it, including important application state.
Therefore, if you have a stateful application you need it to recover its state in case of a restart or a crash - thus we need a way to persist that information to a network location where it can be stored to be retrieved later. We can also use this same persistance mechanism in our application to allow migration of one node to another, such as when we’re scaling up an Akka.NET cluster during high loads. Akka.Persistence’s recovery mechanisms allow us to easily migrate data from one node to any other node that has access to the database.
We can implement this state recovery in our application using Akka.Persistence and MongoDb. To specify that we want to use MongoDb for our journal persistence, we can do so by defining what plugin we want to use. If we go to our app.conf file inside our Akka.CQRS.TradeProcessor.Service project we can uncomment line 21 to add akka.persistence.journal.mongodb as our plug in.
Our final configuration should look like this:
akka {
	actor {
		provider = cluster
	}

	remote {
		dot-netty.tcp {
				hostname = "127.0.0.1"
				port = 5055
			}
	}

	cluster {
		#will inject this node as a self-seed node at run-time
		seed-nodes = ["akka.tcp://[email protected]:5055"]
		roles = ["trade-processor" , "trade-events"]
	}

	persistence{
		journal {
		    plugin = "akka.persistence.journal.mongodb"
		    mongodb.class = "Akka.Persistence.MongoDb.Journal.MongoDbJournal, Akka.Persistence.MongoDb"
	            mongodb.collection = "EventJournal"
		}

		snapshot-store {
		    plugin = "akka.persistence.snapshot-store.mongodb"
		    mongodb.class = "Akka.Persistence.MongoDb.Snapshot.MongoDbSnapshotStore, Akka.Persistence.MongoDb"
		    mongodb.collection = "SnapshotStore"
		}
	}
}
With our application now ready to use MongoDb for Akka.Persistence, we need to tell our application how to connect to it by proving a connection string. We will be deploying a MongoDb container later on using docker-compose but for now we need to have a way to pass this information in. To ensure we are able to deploy our Docker container in multiple environments, we want to avoid hard-coding the connection string into our code. Instead we want to be able to pass in the connection string for our database as a variable. We can do this by injecting the MongoDb connection string into our ActorSystem’s configuration via an environment variable.
Lets go back to our AppBoostrap.cs file in our infrastructure folder. In here we need a way to tell our configuration that we want to pass in a connection string if we need to persist our journal. While there are various ways to achieve this, we have implemented the following code that you can add to your project which will allow you to bring in the connection string using the environment variable MONGO_CONNECTION_STR:
public static class AppBootstrap
{
	public static Config BoostrapApplication(this Config c, AppBootstrapConfig appConfig)
	{
	    var config = c;
	    if (appConfig.NeedPersistence)
	    {
		var mongoConnectionString = Environment.GetEnvironmentVariable("MONGO_CONNECTION_STR")?.Trim();
		if (string.IsNullOrEmpty(mongoConnectionString))
		{
		    Console.WriteLine("ERROR! MongoDb connection string not provided. Can't start.");
		    throw new ConfigurationException("ERROR! MongoDb connection string not provided. Can't start.");
		}
		else
		{
		    Console.WriteLine("Connecting to MongoDb at {0}", mongoConnectionString);
		}


		config = c.WithFallback(GetMongoHocon(mongoConnectionString));


	    }
	    config = config
            	.WithFallback(GetOpsConfig())
           	//.WithFallback(TradeEventSerializer.Config)
            	//.WithFallback(ClusterSharding.DefaultConfig())
            	//.WithFallback(DistributedData.DistributedData.DefaultConfig()) // needed for DData sharding
            	//.WithFallback(ClusterClientReceptionist.DefaultConfig())
            	//.WithFallback(DistributedPubSub.DefaultConfig())
            	.BootstrapFromDocker();

	// rest of method
	}
}
This is all the changes to our code that we need to implement before we are able to deploy our Docker containers.
Using docker-compose
One of the useful tools that you will be using when you are working with Docker will be docker-compose. This tool allows you to define and run multi-container applications that are already networked together by running one command. Through the use of a YAML file, you can create and run multiple containers as a service without having to spin each container individually.
Let’s begin by composing a docker-compose YAML file that we can work with. In this file we will tell Docker what containers we want to create and what images we will use to create those containers. When creating our YAML file there are a couple of things we want to be aware of. First, we need to make sure we are setting the right version for our YAML file. The version specified in the file will determine the file syntax version that will be used. For our example we will be specifying the latest version and our first line should look like this version: '3.7'.
With our version set, we can now being defining the services that we will need. We will start defining our services inside of a services: block. Let’s start by creating our MongoDb container. This container will be the database used by the services in our application to persist our data. The services: block will have the following structure:
services:
  (Name of the container in production):
    image: (Image that you are using to create your container):(version of the image you want to use)
    hostname:(The hostname used by other containers to reach this container)
    restarts:(Tells the container if it should restart if the system restarts)
    ports:
      - "Host machine port number":"Docker port number"
    environment:
      (Environment variable):(value)
    depends_on:
      -(Service name that this container depends on)
Following the structure above, lets continue working with our YAML file by creating our MongoDb and MondgoDb Express containers. We want to name our MongoDb container as “mongo” using the image version 4.0. We also need to specify an environment variable for the name of the database we will be creating. The variable name will be MONGO_INITDB_DATABASE and its value will be akkaTrader to describe our TradeProcessor service.
For MongoDb Express we will name the container “mongo-express”, it will run of the image mongo-express with the latest version. If we want to run with the latest version, we do not have to specify :latest in the image section. This will be set as default. We will need to communicate with MongoDb Express to get information about our database so we will need to map the containers port to a port in our host machine. For this example we want to map the container port 8081 to the host machine’s port 8031. Finally we need to specify our container dependency. MongoDb Express will depend on MongoDb, so we want to make sure MongoDb is running before we spin up this container. We can do this by using the depends_on: section. Here we can tell Docker to wait for the mongo container to come up before we try to create and run this container. With this, we should have a file that looks like this:
version: '3.7'

services:
  mongo:
    image: mongo:4.0
    hostname: mongo
    restart: always
    environment:
      MONGO_INITDB_DATABASE: akkaTrader

  mongo-express:
    image: mongo-express
    restart: always
    ports:
      - '8031:8081'
    depends_on:
      - "mongo"
We want to do this for all of the services we will need to run our application. We will need to add a Lighthouse container to act as our seed node for our cluster, a tradeprocessor container that runs our akka.cqrs.tradeprocessor image, and finally we need to add our traders container to run our akka.cqrs.traders image. You can copy the following docker-compose.yaml file, which includes all of the services that we need to run our application using Docker containers, to the root of your project:
version: '3.7'

services:
  mongo:
    image: mongo:4.0
    hostname: mongo
    restart: always
    environment:
      MONGO_INITDB_DATABASE: akkaTrader

  mongo-express:
    image: mongo-express
    restart: always
    ports:
      - '8031:8081'
    depends_on:
      - "mongo"

  lighthouse:
    image: petabridge/lighthouse:latest
    hostname: lighthouse
    ports:
      - '9110:9110'
      - '4053:4053'
    environment:
      ACTORSYSTEM: "AkkaTrader"
      CLUSTER_PORT: 4053
      CLUSTER_IP: "lighthouse"
      CLUSTER_SEEDS: "akka.tcp://AkkaTrader@lighthouse:4053"
      STATSD_PORT: 8125
      STATSD_URL: "graphite"
      JAEGER_AGENT_HOST: "jaeger"

  tradeprocessor:
    image: akka.cqrs.tradeprocessor
    ports:
      - '0:9110'
    environment:
      CLUSTER_SEEDS: "akka.tcp://AkkaTrader@lighthouse:4053"
      CLUSTER_PORT: 5110
      MONGO_CONNECTION_STR: "mongodb://mongo:27017/akkaTrader"
      STATSD_PORT: 8125
      STATSD_URL: "graphite"
      JAEGER_AGENT_HOST: "jaeger"
    restart: on-failure
    depends_on:
      - "mongo"
      - "lighthouse"

  traders:
    image: akka.cqrs.traders
    ports:
      - '0:9110'
    environment:
      CLUSTER_SEEDS: "akka.tcp://AkkaTrader@lighthouse:4053"
      CLUSTER_PORT: 5110
      STATSD_PORT: 8125
      STATSD_URL: "graphite"
      JAEGER_AGENT_HOST: "jaeger"
    restart: on-failure
    depends_on:
      - "lighthouse"
Save this docker-compose.yaml file to the root of the solution.
Run docker-compose up
With our docker-compose YAML file ready, we can now start building our application. For us to be able to compose our application we need to make sure our images are available before we run docker-compose. If you have not built your images please reference our how to build an image article for more information.
With our images ready, let’s open our command prompt and guide it to the root for our repository. We can get our application up and running by running the command docker-compose up in our command line.
PS> docker-compose up
Running this command will build and run the Docker containers for the services defined in the docker-compose YAML file. The results of running this should be similar to the output below:
The continuous log information shows our cluster up and running. You can see our Lighthouse and TradeProcessors logging information being written out to the console. Let’s take a deeper look and use our pbm tool to connect to one of our TradeProcessors so we can checkout the status of the cluster. First we need to get the port that was exposed to our machine, we can use Kitematic to get this by selecting the TradeProcessor node and inspecting the Access URL section as shown below:
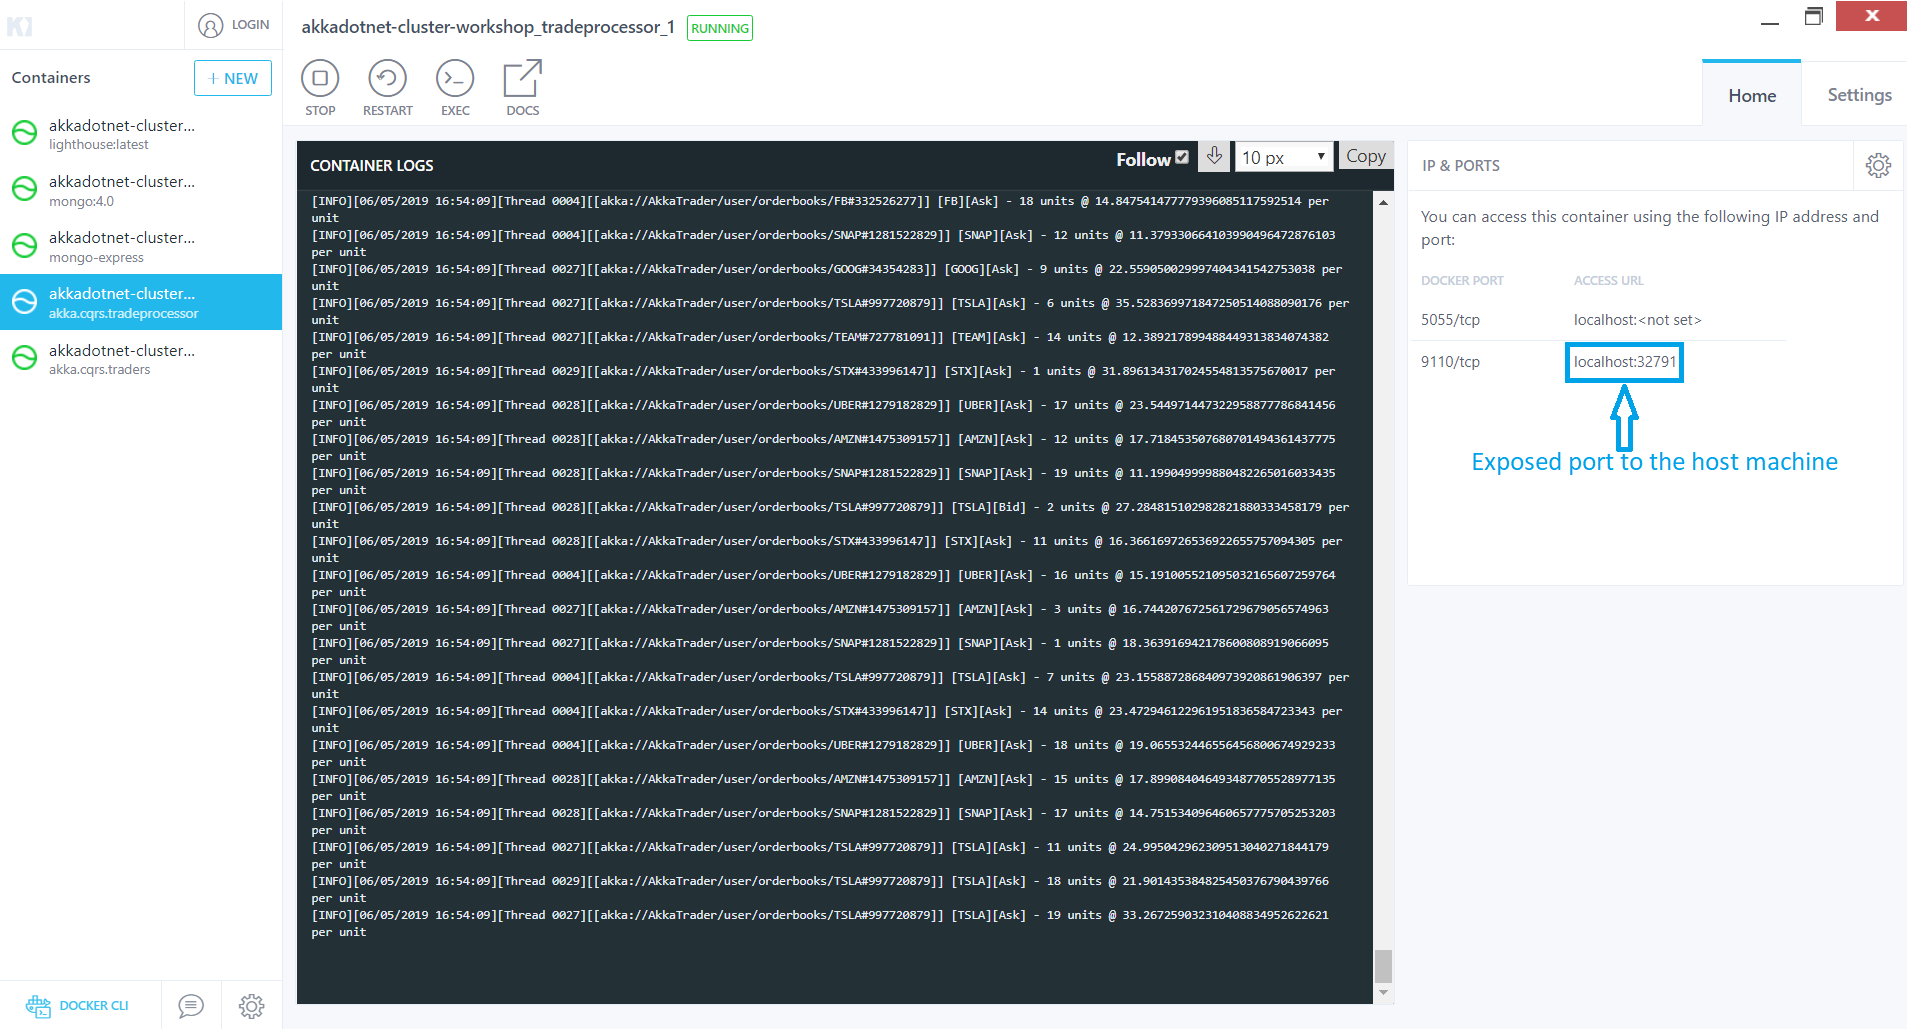
With the port number ready, let’s get a new command prompt window up and lets get our pbm client connected to the pbm host in our node by typing the command pbm 127.0.0.1:[the port number found in Kitematic]. This will establish a connection to our node and download the available command palettes to our client. To get a list of the available commands we can type in help to display all of the commands. If we would like to check the status of our cluster, we can type in the command cluster show. This will show all the nodes in our cluster and the status of each one.
Now that we have our cluster up and running, lets try scaling up one of our services through docker-compose. We can increase or decrease the number of available services by using the scale argument in Docker compose. To get a better idea of what is going on, let’s use our cluster tail command in our pbm tool to display clustering events and lets scale up our TradeProcessors by typing in docker-compose up --scale tradeprocessor=[Number of services needed]in a second command prompt pointing to the root of our project. You should see something similar to this:
Next
Now that our Akka.NET cluster is able to run inside Docker, we should enforce some AKka.Cluster best practices - and that’s what we’re going to do in Lesson 3 - Akka.Cluster Best Practices for Continuous Deployment.