// BLOG
How to Use Github Professionally
Best Practices for Working with Github in Team Settings
I originally started writing this post as internal documentation for our own team here at Petabridge, but I thought this would be useful for our readers and users as well.
Github has evolved over the years into a vast, rich ecosystem filled with lots of first and third party features that make developers more productive and effective.
Yet the vast majority of developers haven’t had much experience working effectively with Github in day-to-day work. Many developers don’t have a Github account; some have created some simple projects or filed some bug reports on popular projects; and few have forked a repository and made a pull request.
In this post you’re going to learn the best practices for working with teams of developers on Github who are working towards producing production-ready software. Everything in this post is equally applicable for developers working behind the firewall on proprietary software via Github Enterprise as it is for developers who want to submit a patch to popular open source projects like Akka.NET.
Two Unnecessary Costs of Software Development
Putting my “Chief Technology Officer” hat on for a second, there are lots of cost levers behind the total expense of software development and most of them are necessities. Yes, we should always allow plenty of time and money for testing and user feedback. Yes, we should try to pay down technical debt. We’re not talking about any of that.
What I’m talking about are unnecessary costs, waste costs, that can be avoided via using Github effectively as a communication platform among a development team. Those costs are:
- False starts - designing the wrong thing from the beginning;
- Blind alleys - designing the right thing using the wrong strategy.
In both of these cases the developers’ time and company money is wasted. These occur when there’s insufficient communication before and during the coding process.
Private companies working on proprietary software can mitigate a small amount of this through standardizing development processes, but open source projects are a total free-for-all.
In the end, what’s needed in order to eliminate false starts and blind alleys is for individual developers themselves to practice using Github effectively in order to not waste their own time and effort working on the wrong thing. This guide will help show you how.
Create Github Issues before You Code
Three common uses for Github issues:
- Reporting a bug with the project;
- Proposing a new feature or change; or
- Discussing tactical and strategic issues with other stakeholders, i.e. “how should we support future versions of .NET going forward?”
Here’s what all of these have in common: they give other developers and stakeholders on the team a chance to weigh in and share information before coding.
Maybe the bug you reported was fixed in a newer version of the software? Perhaps the new feature you’re proposing had been tried before and removed because it introduced too many maintenance costs?
You’re a single developer - you’re only effective up to the limits of your own knowledge, talent, and experience. When you create an issue on Github and get into communication with your team you can leverage the collective knowledge of everyone else. You will routinely save yourself hours of wasted effort if you get into communication early.
Use Github Issue Templates on Your Repository
Github issues act as a form of preemptive communication - rule out false starts before you start coding. One way to make Github issues even more effective is to standardize the reporting of issues via Github issue templates.
What these issue templates allow teams to do is standardize the first wave of communication to include relevant details the rest of the team needs to understand in order to discuss the issue effectively. A small example of this: including the version of the software being described in a bug report.
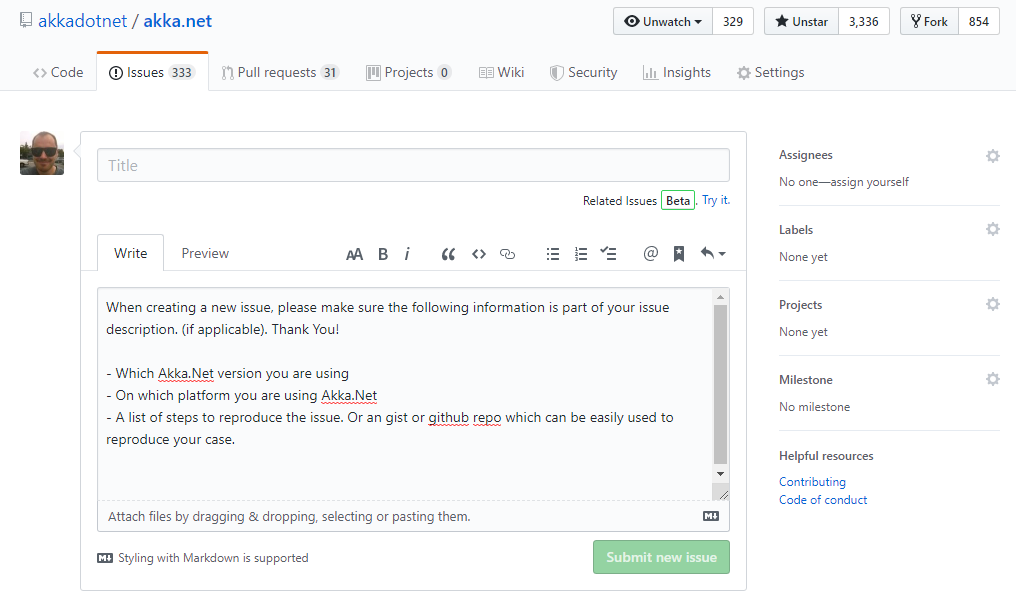
Without that piece of information it’s really difficult for regular code contributors to determine if a user is reporting a new bug or one that may have been solved in an earlier release. Github issue templates resolve this issue by gently guiding a user towards providing this data during the issue reporting process.
In other words, Github issue templates help set the informational requirements and expectations for developers who might be new to the project - templates help both new and experienced developers communicate more effectively together.
Use Github Permalinks when Discussing Code
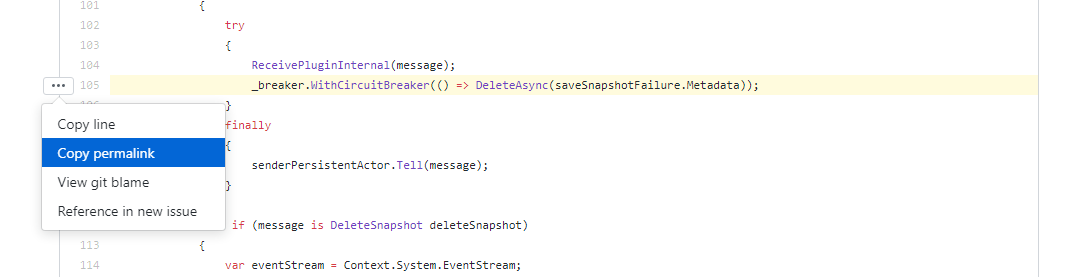
One of the most effective tools to come to Github is the permalink- the ability to quickly reference an entire section of code and drop it into a Github issue so it can be unambiguously shared with the team at large.
To get a permalink, click through the repository’s source code in your web browser, click the file you want, scroll down to the lines you want to select, select them, and then click on the gutter to get the following menu.
Paste the link you just copied into a Github issue and it’ll look like this once you post it.
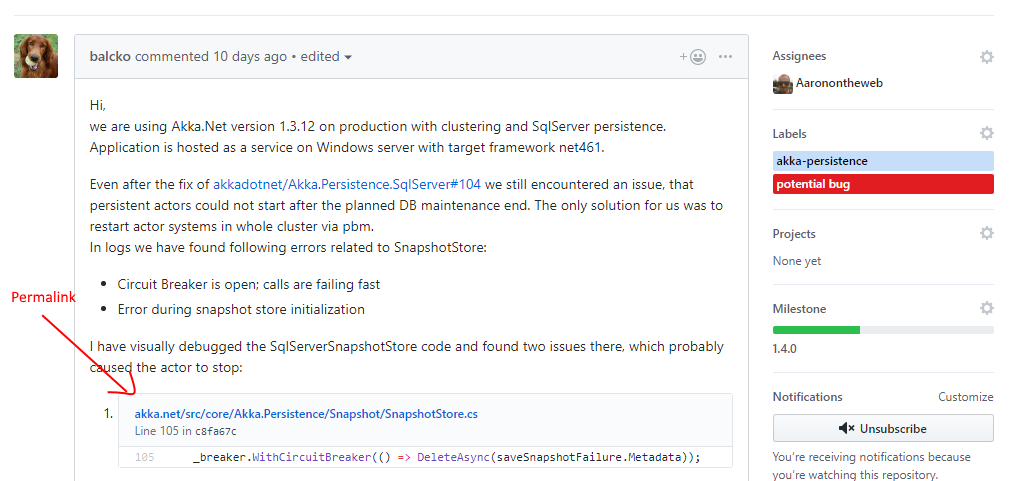
N.B. You can see the full Akka.NET Github issue I’m referencing in the screenshots here.
What makes Github permalinks effective?
- They can link to the file’s state on the exact branch or even the exact commit, which can be really useful for discussing how a file changed between versions of the software.
- The formatting is consistent and includes lots of useful information, such as the line numbers of the snippets.
- Clicking through on the permalink takes you directly to the lines in the source file that were highlighted, so you can look at what’s happening in the rest of the code above or below the snippet if you need to understand the full context.
Github permalinks provide a high degree of easily accessible context and they do it inexpensively. They make your technical communication more precise and reduce the cost of fix bugs and address design questions. Use them liberally.
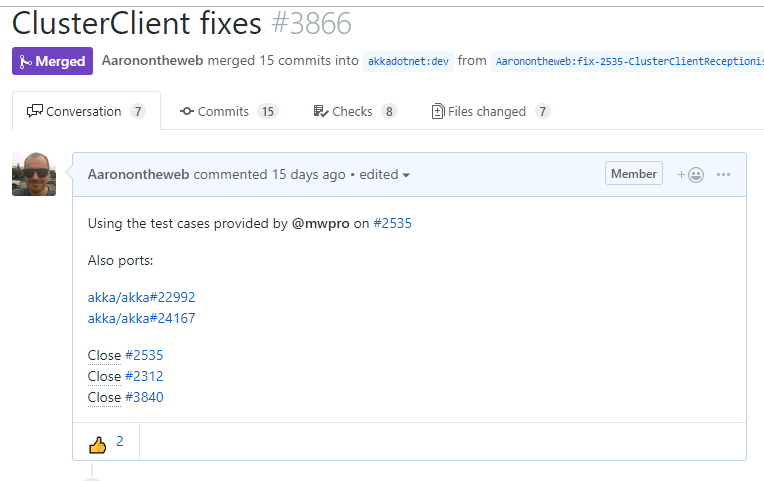
Cross-link Related Github Issues
Github’s communication allows for easy cross-linking of issues between pull requests, issues, and even issues across different projects.

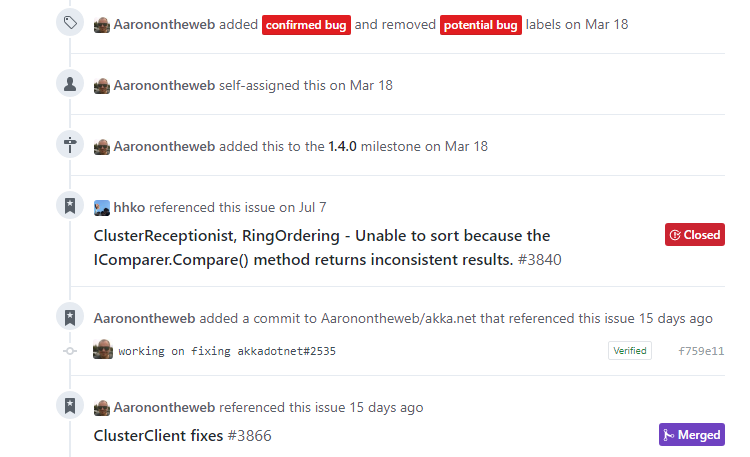
Once issue #3840 links to issue #2535, anyone who looks at issue #2535 will be able to see the link back from #3840.
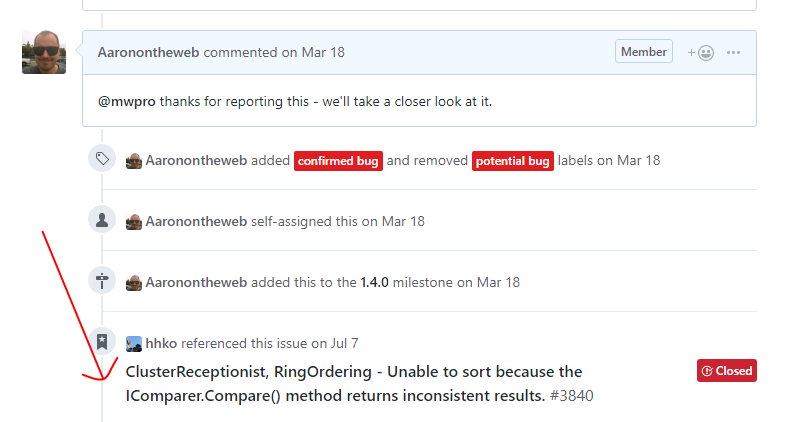
This helps cast a wider net on a project for developers who are trying to troubleshoot a problem or are gathering data for a future design. They can follow the breadcrumb trail in both directions to gather clues and information from the previous issues. Creating a web of information back and forth, locally within a project or even across projects, is a robust practice that should be encouraged and followed when at all possible.
Use Checklists for Large Issues
Suppose you want to start working on a more complex issue, like implementing a new feature or migrating to a new build system. Rather than create a big network of issues right away, it’s often preferable to use a checklist within one issue instead.
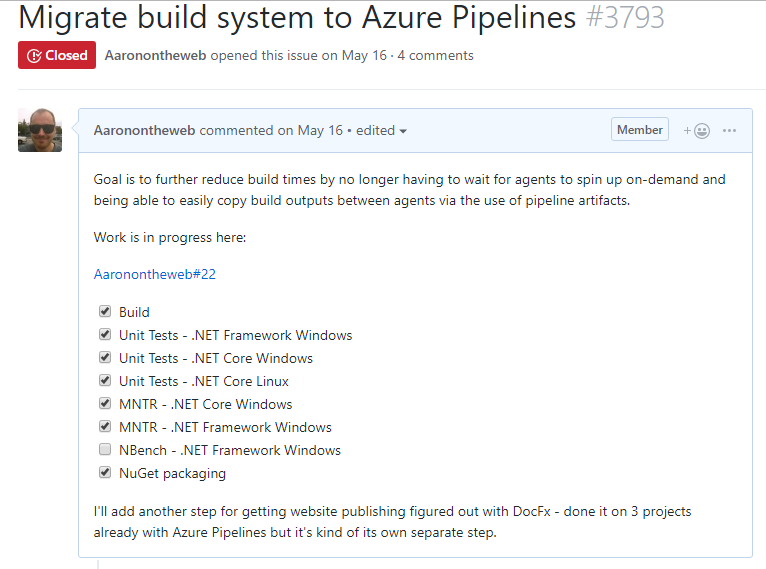
Why is it preferable to use a checklist instead? Because all of the pull requests used to implement this feature can all refer back to the same issue and the progress made against a large issue like this one (migrating to a new build system) can be easily groked by looking at which boxes are checked and which are not. The entire context of the work done against a large task can be found in one place.
Github even uses this checklist system to print out a small progress summary when looking at the lists of open issues.

To create a checklist in a Github issue, you need to use a markdown checklist like this:
* [x] Build
* [x] Unit Tests - .NET Framework Windows
* [x] Unit Tests - .NET Core Windows
* [x] Unit Tests - .NET Core Linux
* [x] MNTR - .NET Core Windows
* [x] MNTR - .NET Framework Windows
* [ ] NBench - .NET Framework Windows
* [x] NuGet packaging
When you check the box on a Github issue, it’ll mark that stage of the task as complete automatically without you having to edit the original description.
Use Issue Labels Sparingly
Github issue labels are a great tool that makes it easy to organize and aggregate similar kinds of issues quickly. For instance, if I want to quickly see all of the issues affecting Akka.Remote, part of the AKka.NET project, I can click on the “akka-remote” label to see all of those on the Github repository.
However, the trick with labels is to use them tersely. For instance, we have a “critical” label we apply on bugs that have created downtime for end-users - if we applied “critical” to every single issue then the label becomes meaningless.
Useful labels, when used sparingly, make it really easy to slice and dice the set of open issues into independent categories. If I’m responsible for managing the end-user experience, I want to be able to quickly see those issues - I don’t care about data access problems that affect our back office reporting.
Group Issues into Milestones
I avoided using milestones for years, but now they’re one of my favorite Github tools because they help communicate priority of issues to the developers we work with.
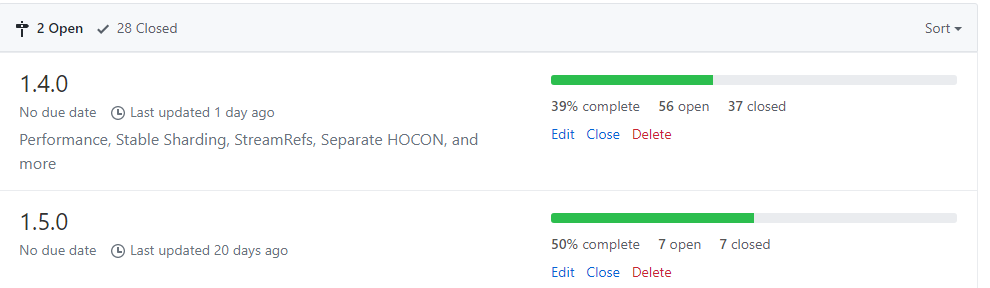
Issues that are part of the v1.4.0 milestone are more urgent / cheaper-to-implement than the issues in the v1.5.0 milestone, so the thinking goes.
But really, the value in having milestones is that they concisely answer the question “what’s going to be included in the next release?” Helping your team walk away with the same answer through the use of Github milestones is about as easy as it gets.
Use Pull Requests when You Begin Coding
Notice the title of this section isn’t “use pull requests when you’re finished coding” - that’s the number one mistake people who are new to Github make.
The previous section on working with Github issues was about preventing false starts through better communication. This section is about using Github pull requests to prevent going down blind alleys by doing the same.
Don’t “Hold” a Pull Request Until the Job is “Done”
Submitting a pull request isn’t the end of the process - it’s the start. It’s not the same as pushing a new commit into the development root of your repository; a pull request is simply a proposal for a code change.
The most effective way to use pull requests is to get code out in front of other developers on your team early and often, before you’ve invested too much development time into something new. If you’re going down the wrong path or if your work is in conflict with someone else’s it’s better for everyone to have that conversation early.
Put pull requests in front of your team quickly - the code review tools on Github’s pull request dialog are excellent and precise. You can get feedback quickly and leverage the knowledge and experience of your team right away, rather than when it’s too late.
Avoid “Monster” Pull Requests; Keep PRs Small
Suppose you propose a new feature or code change - you know it’s going to be the first part of a 40 hour long project. You can either:
- Complete all 40 hours of it and submit the entire thing in one giant pull request once it’s done.
- Or you can break up the issue into lots of small, separate PRs that can each be reviewed independently while you work on something else.
With experience, number 2 becomes the obvious choice because:
- Each pull request is relatively small and independent, which makes the commit history more granular and easier to manage;
- Code reviews can be conducted quickly;
- You can get CI to run on each successive commit you add to your pull request, which helps you debug as you go; and
- You can work on multiple tasks concurrently while previous pull requests are waiting to be reviewed.
In other words, strategy number 2 decreases the human costs associated with developing software: it allows for other developers to comment early (avoid blind alleys) and gives them smaller units of code to review (faster iteration speed.)
Strategy 1 often gets picked by new users because they haven’t learned to systematically break apart their work into independent changes.
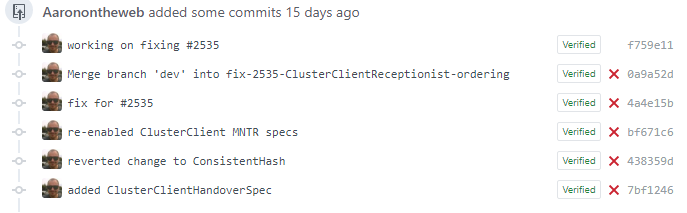
Break Work into Multiple Parallel Pull Requests
For instance, when I started working on an issue for updating some Kubernetes files to target the correct Docker version image our CI system failed because our build script ran into an issue on Linux due to an Azure DevOps update.
Most developers who are new to Github will try to ram the fixes for that unrelated issue into this pull request, because that issue caused this pull request to fail. Well, that’s just yet another unfortunate type of tight coupling and it should absolutely be avoided.
The better practice is to open a separate pull request to attack that issue because it’s independent from the first.
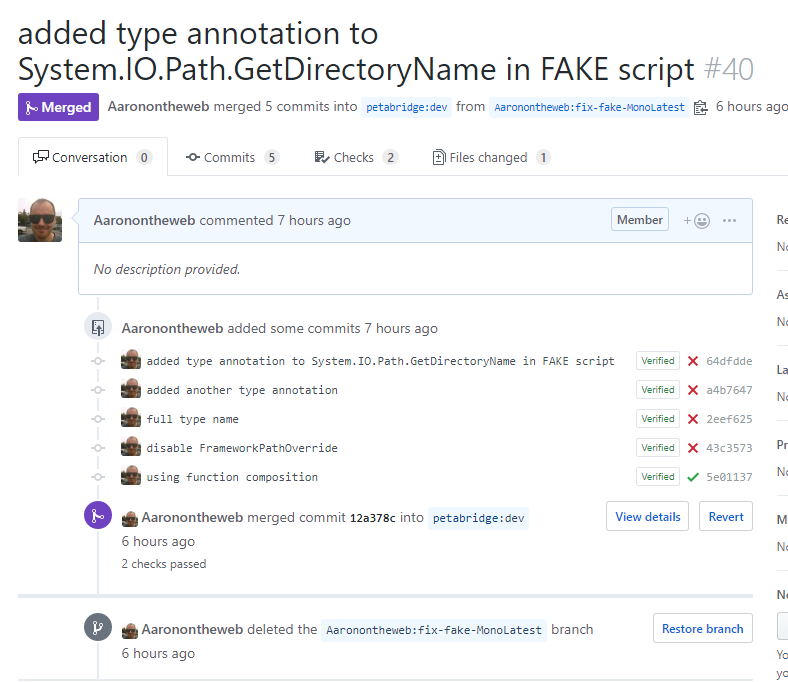
As you can see from the commit history, it took me several attempts to get to the bottom of this issue largely because I couldn’t reproduce the issue on my local machine and I wasn’t initially familiar with how to resolve this type of problem with F#.
However, if someone else on my team needed to review my changes to the Kubernetes YAML files on the original pull request they could do that without also having to review my changes to the build system. Decoupling the issues into their own separate pull requests makes it easier to manage both - because the total amount of context and changes shrinks to a more narrowly targeted area.
Once I fixed the build script, it was easy for me to update the pull request with my Kubernetes changes - Github’s built-in branch protection rules makes it easy for me to automatically synchronize the latest changes from the target branch into the pull request branch.
Always Create Pull Requests on Feature Branches
A must-have for big projects: if the dev branch or master branch is the “target” branch for pull requests, never submit a pull request from the dev or master branch of your own fork. Always separate your work for each individual issue into its own feature branch.
That way if you need to work on multiple issues in parallel you can always rely on having a clean dev branch to keep your local copy of the code synchronized with the root repository’s branch.
We cover the details of branch management and pull request workflow in more detail in our “How to Use the Github Workflow” YouTube video.
Review Your Own Pull Requests
One of the most difficult skills in programming is reading and understanding other people’s code - this is often because the developer who wrote it knows things the reader does not.
For instance, the developer might have written the code in what at first appears to be a Byzantine way, but it turns out this was necessary in order to avoid a runtime JIT bug the developer ran into during the development process. In an ideal world, developers would use code comments for this exact type of knowledge sharing.
But since you’re reading this and are thus interested in being an more effective programmer, here’s a great thing you can do to help both yourself and your team: review your own pull request first.
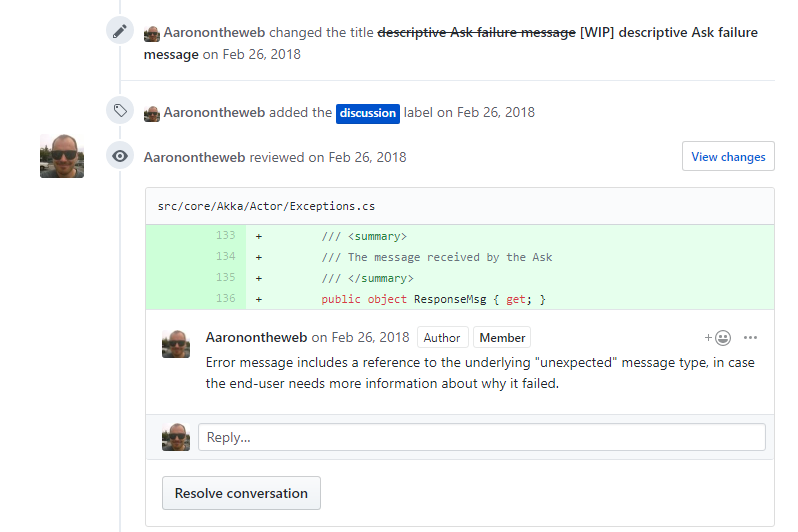
Explaining the intention behind a change, why you’re trying to do it, what are some of the other approaches you tried first, and so forth is all really useful information to share with your team. You don’t need to describe every change in such detail, but it’s a good idea to address the substantive changes in your pull requests this way.
Self-reviews also help direct the external reviewers where to look at your pull request - it helps them separate the signal from the noise. Developer time is always at a premium and you, the pull request author, are the person in the room who knows the most about why you wrote your own code this way. Share that information with the rest of the team to help eliminate guesswork and speculation.
Reference Github Issues in Your Pull Requests
In addition to being able to cross-link Github issues between each other, you can also cross-link Github issues from pull request and specific commits too!
Each of the issues referenced on this pull request will all have a reference back to this pull request, which helps the other developers on our team see the work being done to address them.
I can also reference Github issue numbers in the commit messages I use too.
And just like the pull request itself, those commits which reference the issue number will also appear on the issue too.
In addition to that though, if this pull request is merged into the project each of the issues I listed with close #{issue number} will automatically be closed by Github.
The goal of these features is to help give reviewers and other developers on our team context about what this pull request is for and what it intends to do. The Github issues we reference have valuable context that helps inform reviewers what it is we’re intending to accomplish, exactly.
Use Branch Protection and Continuous Integration
This is a timely recommendation given that Github just released “Github Actions” today, which is their version of built-in continuous integration.
Branch protection and CI give you and your team some really useful feedback, and here are the settings I recommend:
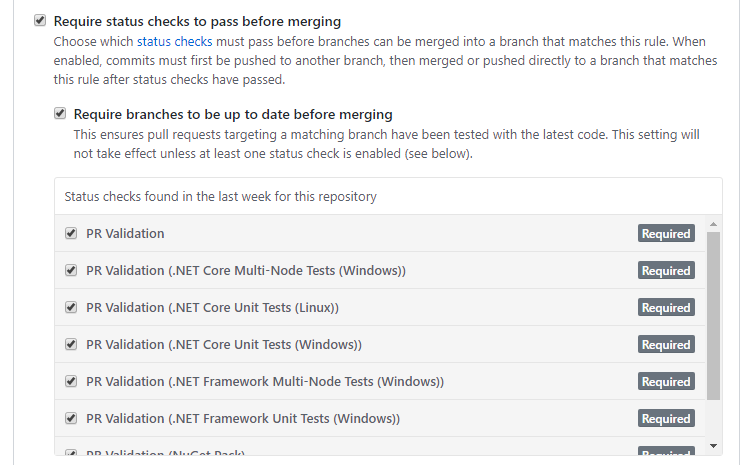
- Always require branches to be up to date before merging - this gives your team that easy “synchronize branch” buttons on pull requests and
- Always require that your continuous integration stages pass prior to merging.
Continuous integration is helpful insofar as it plays the role of “gatekeeper” for certain types of obviously bad code changes, i.e. a compilation failure or a major set of test failures. We even use CI on the Akka.NET project to make sure public API changes aren’t submitted unless they’ve been explicitly approved by a human first.
Wrapping Up
Github is a vast ecosystem with all sorts of tools, projects, third party integrations, and more. You could fill many books on the subject of working with Github.
But Github’s greatest strength is it enables precise technical communication inexpensively. That’s what developers should leverage first and foremost - the ability to get precise, clear feedback early and often. If we’re not doing that, we’re not being effective.
Observe and Monitor Your Akka.NET Applications with Phobos
Phobos automatically instruments your Akka.NET applications with OpenTelemetry — traces, metrics, and logs with built-in dashboards.

Enjoyed this post? Subscribe to our newsletter for more insights on distributed systems, Akka.NET, and .NET + AI.
// COMMENTS